
 |
|---|
 |
WHY - WP6
LED Wall Pack
Key Features
-
Premium Philips LED Chips — High brightness, low lumen decay, and consistent photometric stability throughout the fixture's service life.
-
≥130 lm/W High-Efficiency Output — Energy-saving efficacy that significantly reduces long-term electricity costs without compromising light quality.
-
Controlled Thermal Management — Die-cast aluminium heat sink keeps junction temperature below 85°C, preserving LED efficiency and long-term reliability.
-
Durable Weather-Resistant Housing — Surface-treated ADC12 aluminium offers antistatic, high-temperature, and corrosion-resistant protection (IP65) for sustained outdoor performance.
-
Mercury & Lead-Free Construction — RoHS-compliant, mercury-free and lead-free materials with low ongoing maintenance requirements.
Application
Indoor & half-outdoor project lighting; IP65
Suitable for workshop, factory, storage warehouse, toll station, toll booth, gas station, supermarkets, stadium, exhibition center, and other places.
Dimension (unit: mm)
.png)
Product Parameters
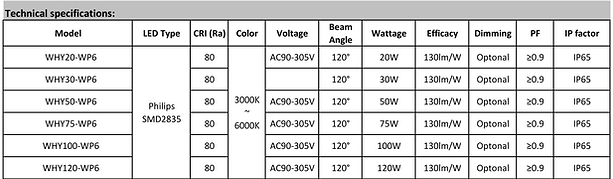
Remarks:
1. Color temperature CCT: CW:5700K, DW:5000K, NW:4000K, WW:3000K.
2. Lumen is based on the condition of Ta<25℃ with the tolerance of ±15%.
Installation drawing A

-
Take apart the PC cover and fixture housing
-
Put the fixture on the wall and drill 3 holes to get through the fixture housing.
-
Insert expansion screws into the holes, match the fixture to the bolts, then fix the fixture to the wall with screws. Lastly, put the PC cover and fixture housing back together.
Installation drawing B

-
Loosen screws and remove the front lens set carefully from the back plate.
-
Remove 1/2'' plug from where you intend to feed conduit
-
Drilling out the holes (C) to secure it on the wall with choosing proper screws.
-
Finish wiring (Black for line, White for neutral and Green/Yellow Green for ground).
-
Replace the lens set on the hinge and finish connection. Close the lens set and tighten the screws to fasten the lens set to the back plate.